
I found some great Pins but the one that I used the most was this post:
http://bubblynaturecreations.com/2013/12/disney-frozen-party.html
It has the recipe for the sugar crystals and the inspiration for my cake but I did mine very differently.


I dyed 1 mix purple (used food coloring) and put it into a rectangle 13x9 glass casserole dish. Make sure you grease and flour the pans good or they will stick& fall out in pieces like mine did! Learn from my mistake! If it does get messed up you can piece it together& cover it all up later!
The next 2 layers were made with 2 round pans. (you can use two 8in or 9in round pans) I used one white cake mix and split it into 2 pans. Pour half into 1 pan then color what's left in your mixing bowl with 3-5 drops of blue food coloring, stir, and put into other round pan. Bake all cakes according to instructions making sure you grease& flour good!
Let cakes cool a little then flip over out of pans. I put my 13x9 one right onto a big cookie sheet with foil (the one i was building the cake on) and the 2 round ones on a cooling rack or plate.While they continue to cool put a piece of bread on top each so they don't dry out! This totally works trust me!

I put a blue swirl in this one. I cut out a circle out of the middle for the top layer but you can leave it big too. My 2 year old got into mine and ate around the whole outside anyway so I had to improvise!
Put your cakes in the fridge until your ready to assemble your cake. You can stack them then put into fridge if you want to.
I did marshmallow fondant on my whole thing. I used this post to make mine:
http://www.momsandmunchkins.ca/2013/11/10/marshmallow-fondant-recipe/
I had plenty to make all the figures and cover the cake with extra to spare! If you buy the figurines you will obviously have lots to spare! (I couldn't find any here at last min but you can prob find the Frozen Busy Book online or at Walmart with all the figures!)
Here are the marshmallow fondant figures i made. I just googled pictures of them and did my best!


If you can't find them you can find tons of free Frozen Clipart here:
http://www.disneyclips.com/imagesnewb5/frozen.html
Or printable Elsa& Anna that stand up here:
http://spoonful.com/printables/elsa-papercraft
So I also made sugar crystals to make the castle. I used blue food coloring to dye the sugar.


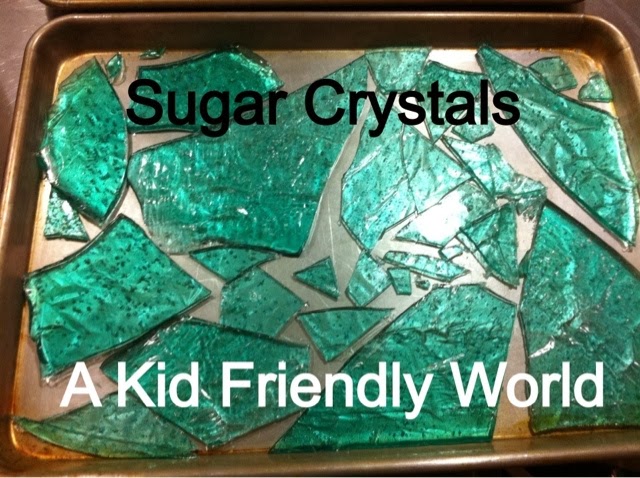
Find instructions to make the sugar crystals here:
http://bubblynaturecreations.com/2013/12/disney-frozen-cake-ice-cream-cake.html
And you can see how I put it all together here:

Now just roll out a bunch of the white fondant until its bigger than your cake, lay it over, smooth it to the cake and decorate!
I also did other cute snacks& decorations!
Now, for decorations& other snacks!

You can find printable banners on Pinterest or find cheap ones at the Dollar store or Walmart. Me& my mother actually made this one out of fabric so we could reuse it over& over again!
Just use your Cricut or Silhouette machine to cut out the letters and iron them on using heat n bond. We used binding for the ties and just cut out triangles using a templet made from cardboard. Easy!


Water bottles with cute "Melted Olaf" labels on them! ( ill post printables soon)

Purple or blue punch- I used sprite with huckleberry ice cream but you could also put blue food coloring in sprite and add vanilla ice cream. Or you could had blue Hawaiian punch or blue koolaid, pineapple juice and sprite with frozen blue punch/koolaid ice cubes!

Add a few balloons and streamers and you have a great party any Frozen fan will love!
You can take it a step further and make
rock candy:http://www.sciencebob.com/experiments/rockcandy.php
Or other ideas: http://catchmyparty.com/parties/disneys-frozen
coloring pages: 224f04a20f7fddb420cf8c6e12095f60
Or google
crowns or antlers: http://www.sisterssuitcaseblog.com/2014/01/frozen-elsa-crown-sven-reindeer-antler.html?m=1
Just check google & Pinterest and go crazy!:)
No comments:
Post a Comment