Day 1--Cute teal shirt (A Friend gave me this! So cute!) with side bow, silver rose/blue-teal earrings (I made them),hair in half pony, jeans (From a clothing swap i believe) and Black boots:) (boots from sears on clearance)


Day 2--Peach Skinny Jeans (Kmart on Clearance $3!!!), Black with white polka dot button up shirt with ruffles (Free! Was given to me!), My trusty black boots I got on clearance at Sears (I bought 2 pairs for when one gets warn out! That's how great a deal I got). Hair in side braid with peach resin rose earrings (I made the earrings too)!


Day 3--Tan/brown Skinny Jeans (G.H. Bass on clearance of course. And extra discount because my uncle worked for Osh Kosh Bagosh in the same mall--under $10 prob),
white old navy tee (cap sleeve--clearance online with gift card I got for Christmas! It was only like $3.50 though),
Teal 3/4 length tee. (Also old navy, but I got at a clothing swap for free!),
Brown boots. I can't remember where I got them, but it's a good piece to have!
Necklace (got a long time ago)& earrings I made.
And brown purse (Thirty-one gifts. I got 1/2 off plus I was selling Thirty-one at the time so commission on top of discount!)
(And slippers I got for Christmas!):)


You could also make this more summery by wearing some sandles or flip flops (teal, white or brown?) And if it was too hot get rid of the teal layer & maybe grab a cute cardigan in case it gets cooler!
Day 4--
I struggled with what to wear this day as you can tell! Which is your favorite?


Number 2?

Which do you think I chose?

Day 5-- Simple with a twist:) Just a 3/4 length black top (I got this top a long time ago at Marices) with this fun black& white scarf (given to me!) I LOVE this scarf! It kept my baby from pulling my hair too so win, win!
A pair of great clothing swap jeans and a hint of purple/black in my earrings and I'm good to go! I'd add my trusty black boots or you can throw on some flip flops or cute flats!
I wore my hair down and flowing.
You could use a different scarf or add more color with the earrings or shoes! Just have fun!


Day 7--Church Day! I clearly wear my cream lace top a lot:) it's awesome. So today I went with a brown skirt with tan polka dots (love this skirt! So comfy and looks awesome no matter hot much baby fat I gain or loose!), a plain white tee with lace top over it, nude heels and my favorite blue belt! I actually have a red, brown, yellow, and white one just like it!:)
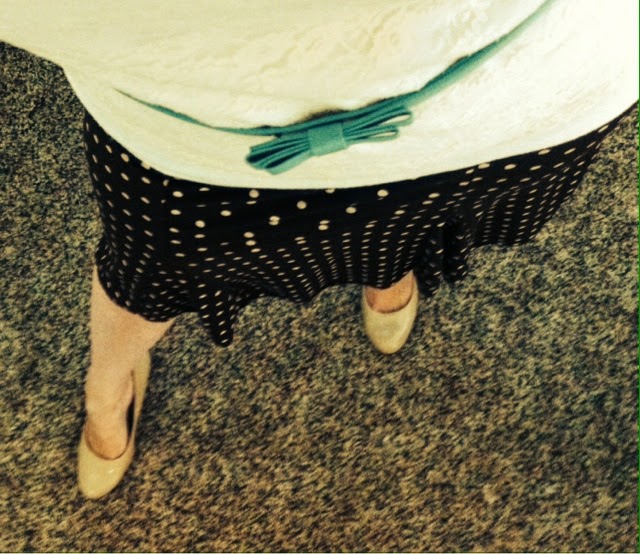
The skirt is "Love Me Kiss Me" but I can't remember where I got it. I've had it awhile!
Shoes were given to me by my mom. A classic must have! You could wear a pair with some more pop if you wanted too but I wanted to add my pop with the belt.
Belt- I bought it in bulk on ebay. No kidding!:)
White tee-old navy
Lace top-I got this at Kmart on clearance! I have a black one just like it! Ya, I'm that awesome! I think it was like $1.50! Ya, I know!:)
I just wore simple diamond earrings but u could wear pearls, a awesome necklace/earring set...I again wanted to draw attention to the belt (and I was lazy) so I just did something simple for jewelry.
You could add a cardigan but who wants to ruin a good thing!:(
So there you have it! 7 days of cute outfits.
Here's a few things I learned along the long path of finding my own unique style (on a budget)
1.wear something YOU love that is also flattering and shows off your personality.
I won't lie, This was not 7 days straight of cute outfits! Let's face it, I'm a mom, which means some days I don't get dressed or showered until noon, other days I get zero me time and I end up with no shower and I'm still in PJs when I go to sleep. That's life, and that's OK.
2.However, that being said, if you can take those few moments a day to throw some real clothes on and throw your hair up it will make a huge difference in how you feel.
I don't wear full make up everyday or even do anything with my hair everyday, but that's OK too. Putting on real clothes may just detract from the fact that I haven't showered for 2 days or put full makeup on in a month. I like to think so anyway:)
So, I hope you can take a few ideas from some of my outfits and apply them to your own wardrobe and
3.Remember it doesn't have to cost $100 to look good and it doesn't have to be free to be a good deal. No matter what your "budget" is you can always find things you love (or will LOVE once you put it together in a cute outfit!)
4. If someone gives you something ask yourself, "Do I love this? What could it be paired with in you existing wardrobe." If you can't answer these questions DO NOT take it or keep it! Same goes for when you are at the store. If you don't LOVE it you prob won't wear it. Just because you think, "that's cute" doesn't mean its the right "fit" for you. In fact if it doesn't fit you right don't buy it either;)
This is a work in progress for me, so I do the next thing a lot:
5. When you get a new piece of clothing put it on a hanger and hang it backwards, if its still turned around in a year (or by the next season), try and create an outfit with it and wear it. If you aren't still in love with it, donate or sell it.
6. If its jewelry or other accessories (belts, scarves,etc) ask yourself how many times you wore it, and what outfit you normally wear it with. If its just a "I like this" but it goes with nothing, either buy any outfit that it does go with (haha im half joking-if you love the piece create a look for it to show it off!) Or get rid of it (donate or sell)
7. Never under estimate the basics! Every girl should have the basics (plain colored tees and tanks, plain colored skirts&pants,etc) Get the basics and dress them up with your own flare! A plain tee can go from boring to fashion statement very easily. Weather its a cool hat, your fav necklace, your fav pair of shoes,your fav scarf,a bold belt, or whatever you may choose its important to add your character to each outfit. It may not be someone else's cup of tea, but that's OK, they can find their own cup of tea and let you drink your own;)
8. Sometimes you find that perfect item that you LOVE but is out of your budget. Its OK to love it. That's how you know what you like. If this happens you can do a few things (or try):
--save up for that item, if you still love it when you have enough, get it. Sometimes I find once I worked that hard for the money to buy it I either find something I love even more or that I could live without it. Or on occasion I have to get it and wear it all the time!:)
--Find something similar for less somewhere else. Think about what you like about it. Is it the color, the pattern, how it fits? Chances are you can find that same color or pattern somewhere else (for less)to help fill your "wardrobe void". Google is a powerful tool my friends!
I've also found a few apps that I like that have helped me find my style and to help me remember the outfits I loved!
**Covet Fashion-- this is a fashion game for grown ups:) it has different events with certain criteria you have to follow. (Certain colors,patterns,brands,etc). It really helped me visualize what I liked or didnt like.
There are a few wardrobe apps out there that you can take a pic of your outfit, tag each item and saves that outfit and each piece so you know what you have and how you wore it before. I tend to just take a pic and never do anything with it so I didn't have the apps long. They also take up lots of space on your phone, but that tool is out there for those who want to try them.
One of my favorite resources is Pinterest. I have a board just for outfits I like. It helps me see what looks good together and what things I might want to add to my wardrobe.
I'm no fashionista and I'm certainly no expert on fashion, but I figured out how to find and put together outfits that I can honestly say I LOVE and will wear many times over! I found what works for me. I found my own personal " style on a budget".
These outfits are more "fall" orianted but I know you can add or take away layers or adjust according to the season:)